%20copy.png)
Integrating BeeCastle with HaloPSA
Step by step instructions to sync your HaloPSA with BeeCastle
This article will run you through the steps required to setup integration for organisations who use HaloPSA.
Setup Process
You can either setup a role that contains the permissions, or configure the permissions directly on the agent. This guide covers setup of a specific role for BeeCastle, as this ensures the least privilege available to our user.
Setup a Role for the BeeCastle Integration
Navigate to Configuration -> Teams & Agents -> Roles
Click New in the top right
Name the role - BeeCastle API Role
Click Save to save the shell role
Click Edit to set permissions
Click on Departments and Teams in the horizontal menu.
Click Add next to Teams. This will pop a modal form.
Add a team that has visibility of opportunities. Your sales team is typically a good choice.
Click Save on the modal.
-
Click Permissions in the horizontal menu, and set the following permissions.
-
Feature Access
Ticket Access = Read and Modify
Clients Access = Read
Users Access = Read
Items Access = Read
Sales Access = Read
Invoices Access = Read
Client Agreements Access = Read
-
Ticket Permissions
Can add new tickets = Yes
Can view unassigned = Yes
Can view tickets that are assigned to other agents = Yes
Can assign to Agents in Teams the Agent is not a member of = Yes
-
Ticket Type Restrictions
Allow use of all Ticket Types = Yes
-
Client Restrictions
Allow use of all clients = Yes
-
Billing Permissions
Can view item costs = Yes
-
Setup an Agent for the BeeCastle Integration
Navigate to Configuration -> Teams & Agents -> Agents
Click New in the top right
Name the agent - BeeCastle API
For “Roles”, select the role that was created above.
Ensure “Account Active” is checked, as well as “Is an API-only Agent”.
Select a default team for the agent, same team that was assigned in the role above.
Set “Default Working Hours” for “Work Hours”
Click Save
Then, click Edit
Select the "Departments & Teams" tab
Click "Add"
In the Teams dropdown, choose all teams.
Ensure that "Can be assigned to", "Can see Unassigned Tickets for this Team", and "Can see Tickets assigned to other Agents in this Team" are checked.
Click Save.
Gather Endpoint Data
Navigate to Configuration -> Integrations -> HaloPSA
Make a note of the Resource Server, Authorisation Server, and Tenant and send to BeeCastle
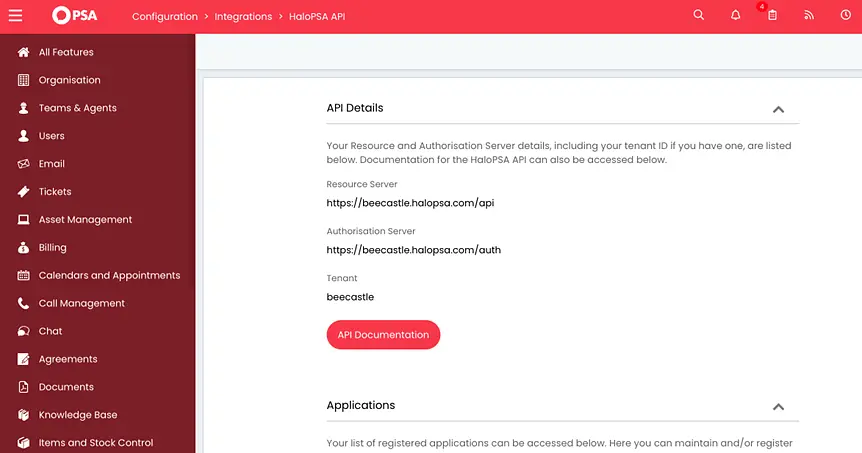
Setup Application
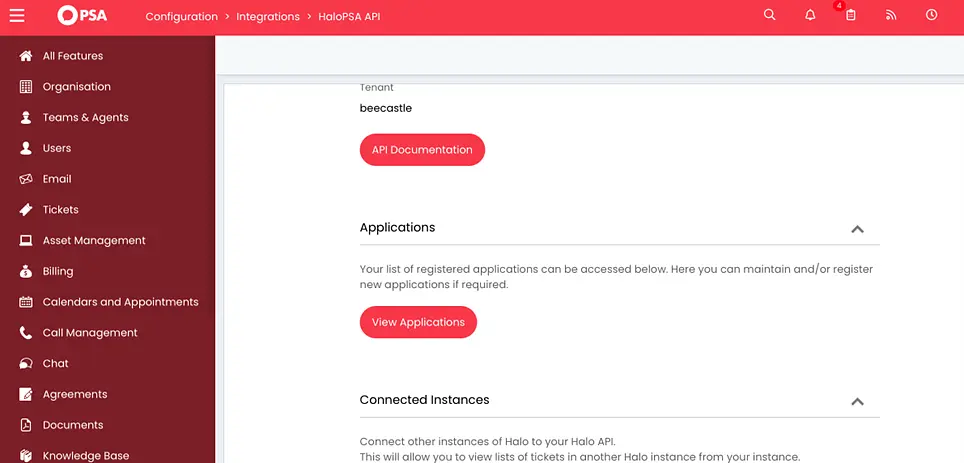
From the above page, click View Applications within the Applications section
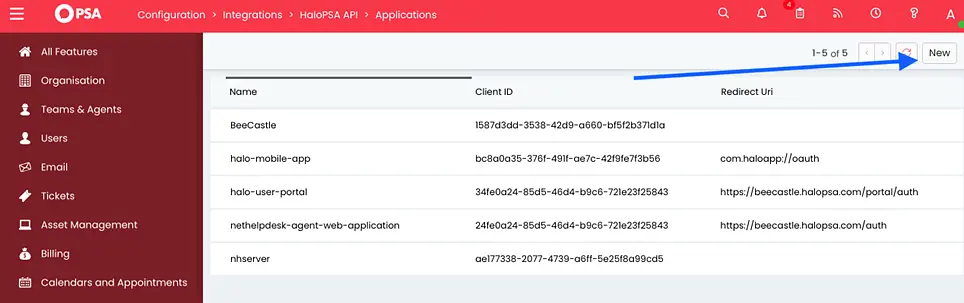
Then click New in the upper right corner
-
Enter the following data on the new application screen
Name: BeeCastle
Active: checked
Authentication Method: Client ID and Secret (Services)
Make a note of the Client ID (below Authentication Method) and Client Secret, and send to the BeeCastle Team
Login Type: Agent
Agent: Choose the agent you created earlier
-
Click Permissions Tab, and add the following permissions
read:customers
read:contracts
read:invoices
read:items
read:sales
read:tickets
Click Save
Setup Webhooks
Webhooks send changes to clients, users and tickets (including opportunities) to BeeCastle as they happen. You create three webhooks in Halo, one each for Client, User and Ticket, using the details BeeCastle gives you. After that, BeeCastle checks them and removes them for you when needed.
In BeeCastle, go to Settings -> Integrations -> HaloPSA.
Under Real-time updates, switch on Enable webhooks, then click Set up in HaloPSA. This shows a username, a password, and a URL and list of events for each of Client, User and Ticket.
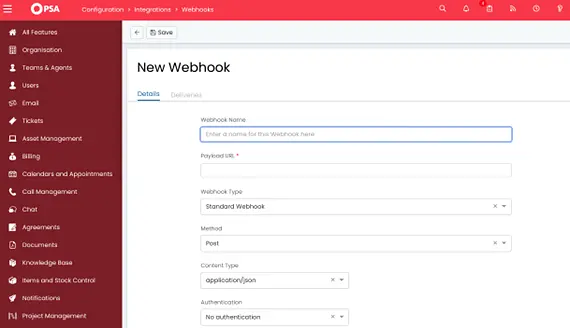
In Halo, navigate to Configuration -> Integrations -> Webhooks
-
Click New in the upper right, and fill in the form for the Client webhook:
Webhook name: BeeCastle Client
Payload URL: the Client URL from BeeCastle
Webhook Type: Standard Webhook
Method: Post
Content Type: application/json
Authentication: Basic Authentication, with the username and password from BeeCastle
Enabled: checked
Use a custom payload: unchecked
Payload type: Small object with key fields only
Batching: off
Events: Client created, Client updated, Client deleted
Click Save.
Repeat for the User webhook (name BeeCastle User, the User URL, events User created, User updated, User deleted) and the Ticket webhook (name BeeCastle Ticket, the Ticket URL, events New ticket logged, Ticket updated). Use the same username, password and settings for each.
Back in BeeCastle, click Check. Each webhook shows as Registered once BeeCastle can see it in Halo.
Opportunity changes arrive through the Ticket webhook, so the Ticket webhook needs no ticket type condition. Tickets deleted in Halo are picked up on the regular sync, because Halo has no ticket deleted event.
For Check to work, and for BeeCastle to remove its webhooks when you switch Enable webhooks off or disconnect, add the admin permission to the BeeCastle application (Configuration -> Integrations -> HaloPSA -> View Applications -> BeeCastle -> Permissions). Without it, the webhooks still deliver, but BeeCastle cannot confirm or remove them.
If you set up BeeCastle before, you may also have a webhook named BeeCastle Webhook pointing at halo.webhooks.beecastle.com. Leave it in place until the BeeCastle team tells you it can be removed.
Was this article helpful?